Cloud Onboarding
LogZilla documentation for Cloud Onboarding
After a LogZilla Cloud instance is provisioned, the first steps involve logging in, updating the password, configuring ingestion from a Linux host using syslog-ng over HTTPS, and verification. Additional resources are provided below.
Prerequisites
- Instance URL, username, and temporary password (from the provisioning email)
- API ingest token (ingest-only token) for HTTPS event submission
First Login
Navigate to the instance URL provided in the onboarding email (note that if the one chosen was unavailable, this may be slightly different than the chosen hostname).
Sign in using the provided username and temporary password.
Update Password
Open Settings and change the password:
- Enter the current password.
- Enter and confirm a new password.
Store the new password securely.
Ingest-Only Token
- The provisioning email includes an API ingest token (prefixed with
ingest-). - This token is used to authenticate HTTPS ingestion to
/incoming. - Security: Treat the token like a password. Rotate it if compromised and update any senders.
- More information about tokens can be found in the API documentation.
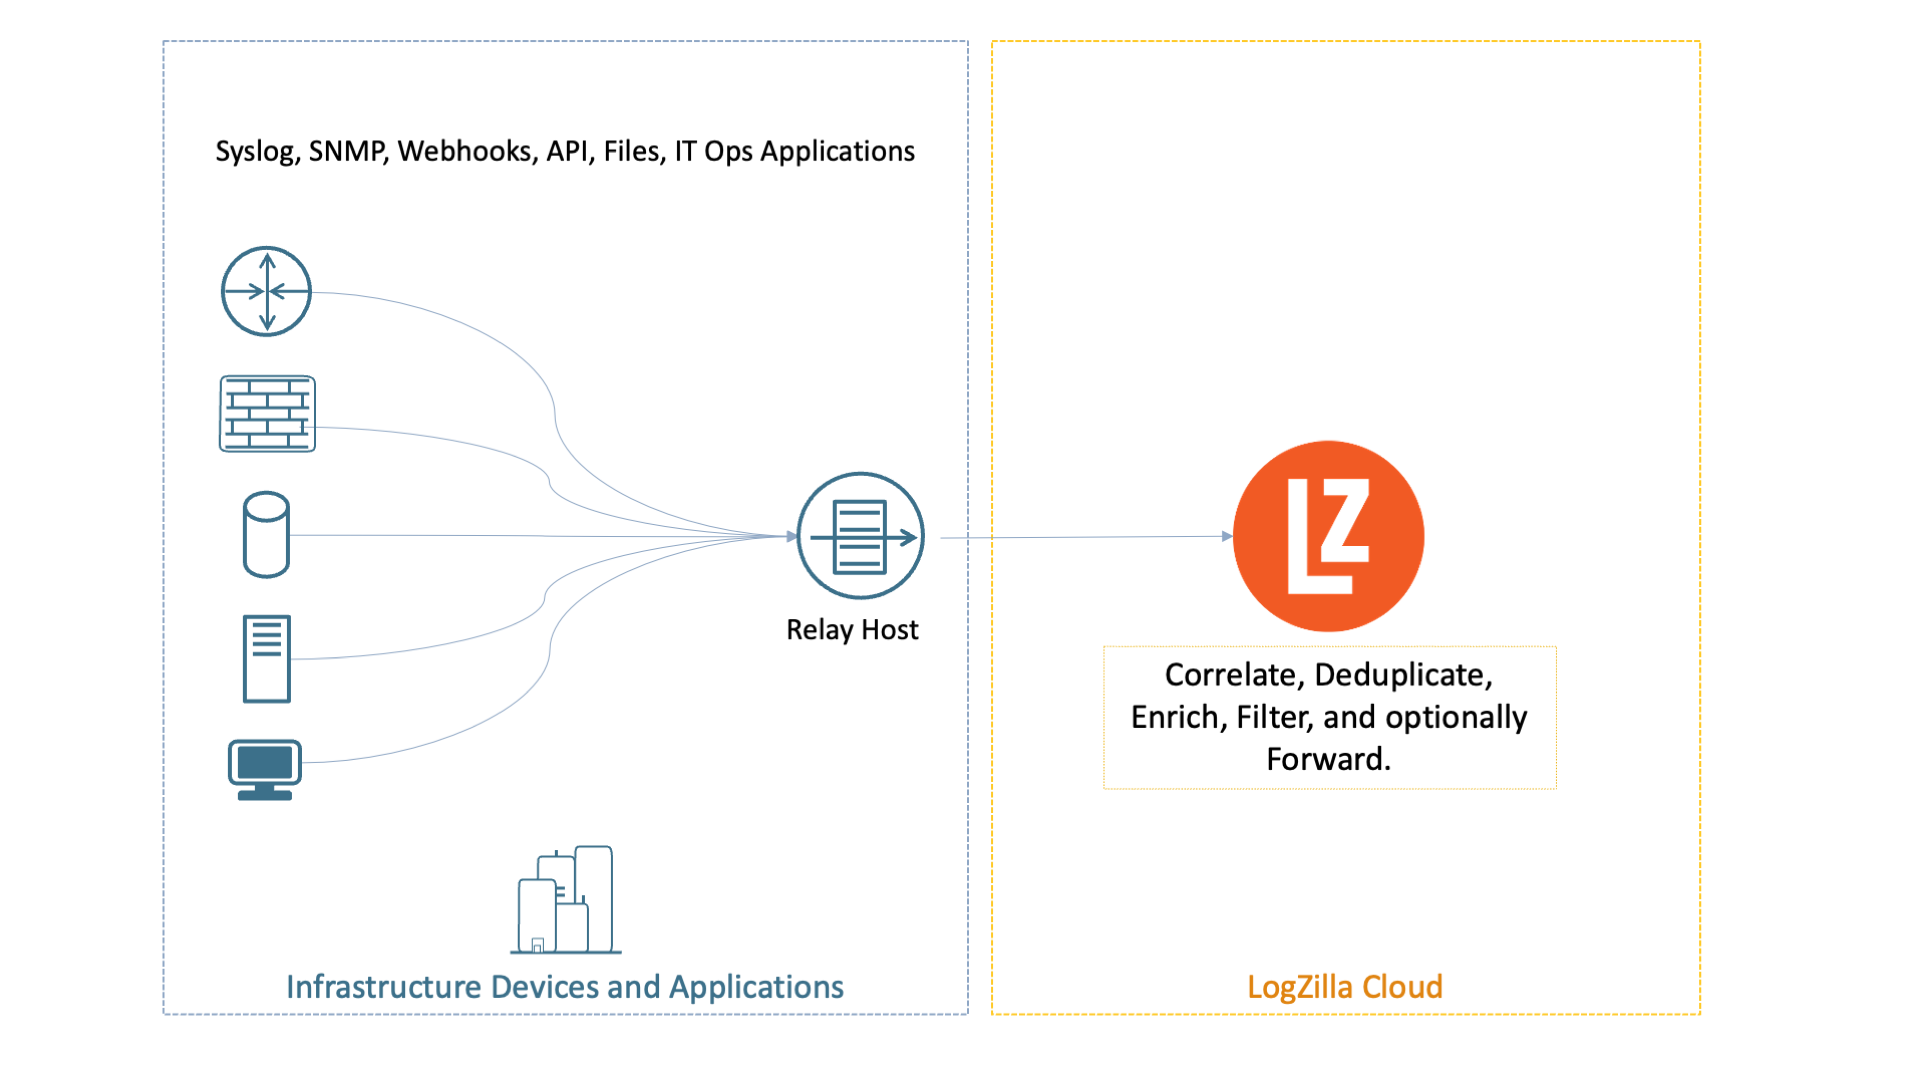
Set Up a Relay
A relay receives events from devices and applications (typically via syslog on UDP/TCP 514) and forwards them securely to LogZilla Cloud over HTTPS using the ingest-only token.
- Devices and apps send syslog to the relay.
- The relay transforms/encapsulates events as JSON and posts to
https://YOUR-HOST.logzilla.cloud/incomingwith headerAuthorization: token YOUR_GENERATED_TOKEN. - Common choices: syslog-ng or rsyslog. Either can run on an existing Linux host or a small VM/container.
Relay flow overview:
Network and security checklist:
- Allow device-to-relay syslog (UDP/TCP 514) as appropriate.
- Allow relay outbound HTTPS (TCP 443) to
YOUR-HOST.logzilla.cloud. - Protect the ingest-only token; rotate it if exposed and update the relay configuration.
The system logger must be configured to relay events to LogZilla Cloud. The installation process varies depending on the system logger being used. To determine which syslog daemon is currently in use, run:
bashcurl -s https://logzilla.sh/detect-syslog-env.sh | bash
Note: to receive logs from other non-linux devices, such as networking equipment, those devices will need to be configured to send logs via the RFC 3164 or RFC 5424 syslog specification to this linux server (or whichever is using the system logger configuration indicated below).
Data Transformation / User Tags. This step is optional, so feel free to skip it if you don't want to add user tag metadata at this point.
Option A: syslog-ng relay (HTTPS to /incoming)
Add an HTTP destination to the syslog-ng configuration to send structured JSON to LogZilla Cloud.
Create Configuration File
sudo vi /etc/syslog-ng/conf.d/60-logzilla-cloud.conf (or sudo nano ...)
Destination and Log Path
Add a destination and a log path similar to the following. Replace placeholders before saving.
confdestination d_logzilla { http( url("https://YOUR-HOST.logzilla.cloud/incoming") method("POST") user-agent("syslog-ng User Agent") headers( "Content-Type: application/json", "Authorization: token YOUR_GENERATED_TOKEN" ) body-prefix("{\"events\": [\n") delimiter(",\n") body('$(format-json --pair priority=int($PRI) --pair host="$HOST" --pair program="$PROGRAM" --pair message="$MESSAGE" )') body-suffix("\n]}") batch-lines(10000) batch-bytes(10485760) batch-timeout(500) ); };
Add User Tags (Optional)
You may attach arbitrary metadata as user tags directly from syslog-ng using
additional --pair entries under a user_tags. prefix. Example lines to
include inside $(format-json ...):
conf--pair user_tags.Location="SJC-1" --pair user_tags.Contact="[email protected]" --pair user_tags.Asset_ID="WEB-0227"
Replace Placeholders
YOUR-HOST→ chosen instance hostname.YOUR_GENERATED_TOKEN→ ingest-only token from the provisioning email.
Validate and Restart syslog-ng
shsyslog-ng --syntax-only
sudo systemctl restart syslog-ng
Notes:
- For very high throughput, prefer a syslog-ng relay with batching.
- When
omhttpis not available, forward rsyslog → syslog-ng locally and use Option A for the HTTPS JSON destination to/incoming.
Option B: rsyslog relay (HTTPS to /incoming)
If rsyslog is preferred or already standard, it can post events to LogZilla
Cloud using the omhttp output module. Availability of omhttp depends on the
distribution; if it is unavailable, forward rsyslog locally to a syslog-ng
relay and use Option A for HTTPS.
Example Configuration
conf# /etc/rsyslog.d/60-logzilla-cloud.conf module(load="imuxsock") module(load="imklog") module(load="omhttp") # ensure this module/package is installed on your OS # Minimal JSON envelope per event template(name="lz_event_json" type="list") { constant(value="{\"events\":[{") constant(value="\"priority\":") property(name="pri") constant(value=",\"host\":\"") property(name="hostname") constant(value="\"") constant(value=",\"program\":\"") property(name="programname") constant(value="\"") constant(value=",\"message\":\"") property(name="msg") constant(value="\"") constant(value=",\"user_tags\":{\"Location\":\"SJC-1\",\"Contact\":\"[email protected]\",\"Asset_ID\":\"WEB-0227\"}}") constant(value="}]} ") } # Post each event to LogZilla Cloud action( type="omhttp" server="YOUR-HOST.logzilla.cloud" serverport="443" usehttps="on" restpath="/incoming" header="Content-Type: application/json" header="Authorization: token YOUR_GENERATED_TOKEN" template="lz_event_json" # reliability queue (tune as needed) action.resumeRetryCount="-1" queue.type="LinkedList" queue.size="10000" )
Validate and Restart rsyslog
shsudo rsyslogd -N1
sudo systemctl restart rsyslog
Notes
- For very high throughput, prefer a syslog-ng relay with batching.
- When
omhttpis not available, forward rsyslog → syslog-ng locally and use Option A for the HTTPS JSON destination to/incoming.
Add User Tags with rsyslog (Optional)
Rsyslog can embed a user_tags object in the JSON payload by extending the
template. For example:
conftemplate(name="lz_event_json_with_tags" type="list") { constant(value="{\"events\":[{") constant(value="\"priority\":") property(name="pri") constant(value=",\"host\":\"") property(name="hostname") constant(value="\"") constant(value=",\"program\":\"") property(name="programname") constant(value="\"") constant(value=",\"message\":\"") property(name="msg") constant(value="\"") constant(value=",\"user_tags\":{\"Location\":\"SJC-1\",\"Contact\":\"[email protected]\",\"Asset_ID\":\"WEB-0227\"}}") constant(value="}]} ") } # Then reference this template in the omhttp action action( type="omhttp" server="YOUR-HOST.logzilla.cloud" serverport="443" usehttps="on" restpath="/incoming" header="Content-Type: application/json" header="Authorization: token YOUR_GENERATED_TOKEN" template="lz_event_json_with_tags" )
Verify Ingestion
Send Test Event
From the Linux host, send a test event:
shlogger "Test LogZilla log message"
Verify with Curl
Optionally, verify end-to-end with curl (replace placeholders):
bashcurl \
-H 'Content-Type: application/json' \
-H 'Authorization: token YOUR_GENERATED_TOKEN' \
-X POST -d '{
"events": [ {
"message": "Test Message",
"host": "curl.test",
"program": "myapp"
} ] }' \
'https://YOUR-HOST.logzilla.cloud/incoming'
Confirm in UI
In the LogZilla UI, confirm reception:
- Events/Sec widget shows bars for received events.
- Most Recent Event Sources lists the Linux host.
- Search for the message (for example,
message:"Test LogZilla log message").
SaaS Administration
- Location:
https://YOUR-HOST.logzilla.cloud/settings/system/saas. - Manage subscription: opens the Stripe customer portal to update or cancel the subscription and manage payment methods.
- Current tier panel: shows plan name, disk space, and daily event limits.
- Change domain/hostname:
- Request a new domain on the SaaS settings page and submit.
- The instance will stop and start under the new domain; this typically takes a couple of minutes.
- Update all senders and relays to the new hostname
(
YOUR-HOST.logzilla.cloud) after the change.
Other Sources
- Forwarding from non-Linux devices via relays: Relays.
- Windows event ingestion using the LogZilla Syslog Agent: LogZilla Syslog Agent